How to Hook Up Subwoofer in Car
Hey there, fellow music lover!
Are you tired of your car’s lackluster sound system? Do you want to add some bass and sub-bass to your tunes? Now, I know what you’re thinking. “But won’t it be expensive to hire a professional?”
Well, look no further because we’ve got the ultimate guide on how to hook up your subwoofer to your car.
With our step-by-step instructions, you can easily install the subwoofers yourself and save some cash.
How to Hook Up Subwoofer in Car
As someone who has been installing car audio for years, I can tell you that adding a subwoofer will make all the difference in your listening experience.
But beware – one wrong connection could lead to costly mistakes. That’s why we’ve put together this comprehensive guide just for you.
So let’s get started!
How to Connect Subwoofer to Car Stereo
Gathering Your Materials
Since a subwoofer doesn’t come with wiring, you’ll need to purchase a wire kit and all the supplies you need separately. Here are the materials you’ll need to install a car subwoofer:
- Amplifier wiring kit
- Sharp wire cutters and strippers
- 15 ft RCA cables and jack (you need one with both white and red connectors)
- Speaker wire
- Screwdriver (Flat blade or Philip)
- Electrical tape
- Ground wire (should be at least 3 ft long)
- Caulk
- Blue remote wire (15 ft)
- Fuse holder and in-line fuse (60-amp)
- Power wire (20 ft)
- Plastic crimp connector
- Crimp ring terminals
Once you’ve gathered all these materials, find a stable and well-ventilated spot to install the subwoofers. Note that powered subwoofers generate a great deal of heat. Therefore, you need to install them in a spot with more room so they can perform better and last longer.
Your car trunk is a good spot to install a car subwoofer since it is easily accessible and provides plenty of room for the subwoofer and external amp. You can also install the subwoofers in the car’s dashboard, rear seat, and anywhere else there’s space.
Routing the Power Wire to the Engine
-
Step One: Safety Precaution
Before we begin the subwoofer installation, let’s go over some safety precautions that need to be taken. Disconnecting your car battery is a necessary safety precaution before installing your subwoofer.
-
Step Two: Route the Cable Through the Firewall
Once you’ve disconnected the car battery, look around your car’s firewall for an opening. If you find an opening there, feed the power wire through it.
If you can’t find an opening there, check inside the car or look around the passenger-side glove compartment for an opening.
You can also use a sharp knife or drill to create an opening. However, take care not to cut any wires.
-
Step Three: Route the Cable to the Subwoofers
After routing the power cable through the firewall, the next step is to extend the wire from the battery to the subwoofers. The power cable is usually colored red but be sure to check the manual to confirm.
Run the cable into the vehicle by threading it through the hole in the firewall and into the vehicle. Then, run the wire from inside the car to the subwoofers.
-
Step Four: Cut a Section of the Wire
Using a sharp lineman’s plier, cut off roughly six inches of the power wire’s front end. Set the section aside for later use.
Once the wire has been cut, it must be long enough to extend from the battery to the location where the fuse will be installed.
Some wiring kits come with an already-assembled fuse assembly. If that’s the case, the fuse assembly doesn’t require wiring. Just route the wire in such a way that the end that contains the fuse is closest to the battery.
-
Step Five: Cut Out the Wire’s Insulation
Next, cut out half an inch of the remaining wire’s insulation. Wire-strip the end of the long power cable inside the engine compartment. If you want to remove the wire’s insulation, wire strippers are the way to go.
-
Step Six: Crimp the Exposed Wire
You can crimp the wire by holding it in the jaws of the crimping tool and squeezing it. The purpose of crimping the wire is so it can fit neatly into one of the fuse’s openings. Next, grab an Allen key and use the tool to open a terminal to securely tighten the terminal in the fuse holder.
-
Step Seven: Connect the Cut, Crimped Wire End to the Fuse Holder
Take the wire you set aside in step four, measure out half an inch from the end, wire-strip it, and then crimp the end. Insert the crimped end into the fuse holder’s open space and tighten it with an Allen key.
This wire will run in the opposite direction of the other power cables, allowing for easy connection to the battery. Next, use a cable tie to secure the fuse holder in place so it doesn’t move about while you are driving.
-
Step Eight: Hooking the Power Cord
Cut half an inch off the free end of the shorter power cable. Next, push the exposed end into the ring terminal’s opening. You will notice a metal ring at the opposite end of the terminal; this ring is designed to cover the positive terminal of the battery.
Put the positive battery cable and nut back in their original locations to make sure it stays put. The battery’s positive terminal is where you’ll attach the ring terminal.
Connecting the Subwoofers to the Stereo
-
Step One: Run the RCA and Remote wires to the Stereo Head
It’s time to run the remote and RCA wires from your car’s trunk to the stereo head. In most cases, the RCA cable has a white and red plug, while the remote’s wire is blue. If at all possible, you should route these cables on the other side of the car from the power cable.
-
Step Two: Detach the Stereo Head From Its Enclosure
You’ll need to pull out the stereo head from its housing to access the wires behind it. Since the process for removing the stereo varies between models, refer to your car’s manual for specific instructions.
-
Step Three: Connect the RCA Cable to the Stereo
Look behind the stereo head for a series of white and red outlets and plug the RCA cables into the corresponding-colored outlets. If your stereo has several white and red outlets, find the ones that are labeled R/SW. They manage the audio of your car’s rear speakers.
-
Step Four: Crimp the Remote Cable and Blue Stereo Wire Together
If you open up your stereo, you’ll see a bunch of colored wires plugged into the black socket. The blue stereo wire may be labeled amplifier, antenna, or remote. Look for the blue wire and connect it to the one you’re using for the subwoofers.
You can do that by stripping 1⁄2 inch of insulation from both wires, crimping their ends, and plugging them into the connector.
-
Step Five: Put the Stereo Back Into Its Enclosure
With the wires connected, push back the stereo into its enclosure. Make sure all the wires are attached and neatly tucked in too. If you removed any side panels when routing the wires, be sure to replace them.
Securing the Ground Wire to Exposed Metal
-
Step One: Look Around the Car’s Frame for an Exposed Bolt or Metal Screw
See if there is any bare metal on the car’s frame, such as a screw or bolt. If you can’t find any contact point on your vehicle, then drill one.
The purpose of connecting a ground wire to the sound system is to route away excess electricity from the stereo.
-
Step Two: Scrape Any Paint off the Bolt
If the metal bolt is covered in paint, use a paint scraper to scrape it off. If you don’t, the ground wire won’t be able to make a good connection to the wire. Also, remove any paint from under the ring connector. This way, you’ll be able to see exactly where the ground wire rests on the panel after installing it.
-
Step Three: Wire-Strip the Ground Wire
The ground wire is usually black and the shortest among other connecting wires. Wire-strip one end of the ground wire and crimp the threads together. This step is important, so the powered subwoofer doesn’t shock you or blow out while using it.
-
Step Four: Attach the Wire to the Bolt
Check your wire kit for ring terminals. If the kit doesn’t come with any or enough rings, get your ring terminal and run the ground wire through it. Push the wire in until you can see it touching the ring.
Next, install the ring by placing it onto the bolt. Consider using a lock to keep the ring terminal pinned in place.
Wiring the Audio Systems
-
Step One: Setting Up the Amp
If your amp isn’t set up yet, then install and wire it. Install the amp right next to the subwoofer enclosure. Some subwoofers are designed with a built-in amp. However, if the amp is separate, it may come with its own set of colored cables to match that of the stereo.
-
Step Two: Hooking the Red Power Cable to the Amplifier
Wire-strip the end of the power cable, crimp the exposed threads together, and then push it into the amp’s power slot. The power slot may be labeled as “Battery,” “Power,” “12v,” or something similar.
You may find a small screw on the power slot. Using a Phillips screw, open the slot, insert the wire, and then close it back up. If your subwoofer has an amplifier built-in, then check the back of the subwoofer for wiring slots.
-
Step Three: Hooking the Blue Remote Wire to the Amplifier
Find the amp’s remote slot (“REM” for “remote”). Just like you did with the power cord, connect the remote wire to the amplifier’s remote slot.
-
Step Four: Hooking the Ground Wire to the Amp’s Negative Slot
Negative slots on amplifiers are used to direct excess power away from the subwoofer and amplifier. Wire-strip the end of the black ground wire and connect it to the slot. Double-check all your connections again.
-
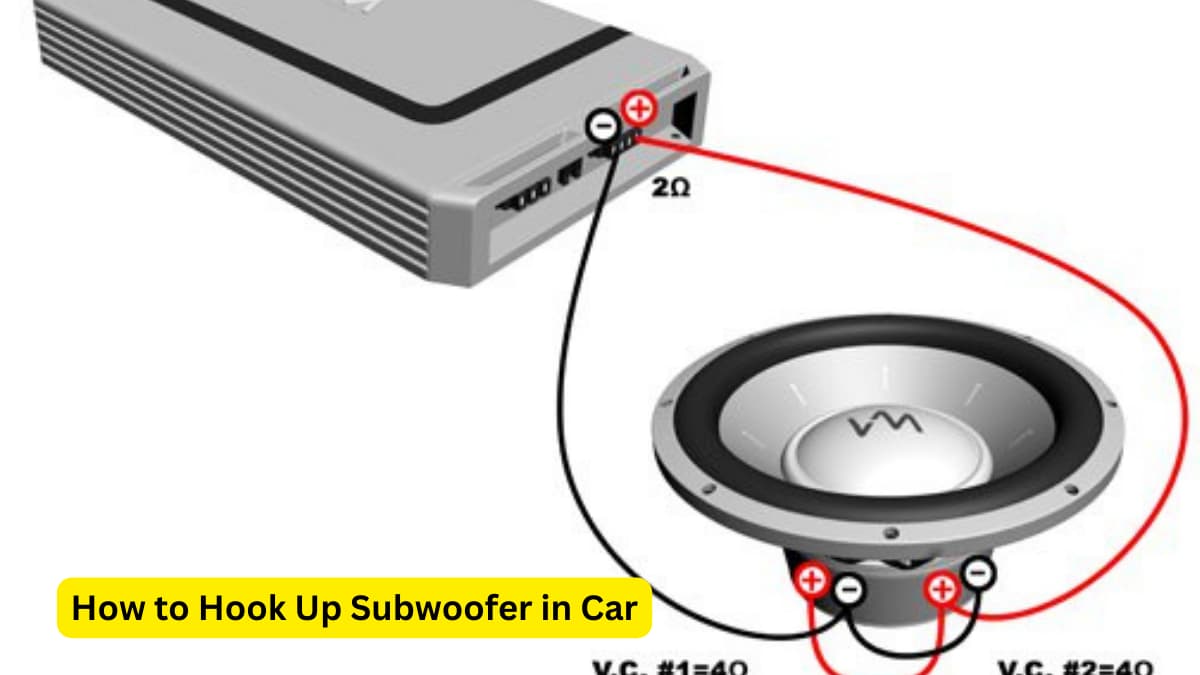
Step Five: Connecting the Subwoofer to the Amp Using the Speaker Wires
Prepare a length of speaker wire that’ll extend to both the amplifier and the subwoofer. Wire-strip both ends of the speaker wire and locate the positive and negative terminals on both devices. Insert one length of wire into the negative port, and another length of wire into the positive port.
Most speaker wires have a bronze-colored coating that makes them look like bare wires. If yours has separate, color-coded wires, then the red wire should go to the positive ports and the black wire into the negative ones.
-
Step Six: Connect the RCA Cable to the Amp
Plug the RCA cable into the corresponding-colored ports on the amp. You don’t need to wire-strip this cable at all. Also, check that the RCA cables are plugged into the correct ports. If plugged in wrong, your car audio system will produce poor sound.
-
Step Seven: Testing the Subwoofer
Now, connect the negative battery terminal cable to the car battery and then tighten the nut with a wrench. Double-check your wiring one last time to make sure all the cables are in the right slots. Then, get into your car and crank the stereo.
If the subwoofer isn’t working as expected, the problem may be coming from a loose cable or faulty connection.
Frequently Asked Questions (FAQs)
-
Do subwoofers make music louder?
Yes, adding subwoofers to your car does make your music sound louder. Add a powerful subwoofer to your trunk space for better bass tones and speaker outputs.
-
Should the subwoofer face back the car?
The best and most typical position for a car subwoofer is facing the boot. If you turn the subwoofer away from the driver, the bass will be more powerful and evenly spread out across the entire car.
Conclusion: How to Install Subwoofers In a Car
Adding a subwoofer in your car will make your car’s audio system sound louder and better. We’ve provided you with a detailed guide on how to hook up a subwoofer in your car in this article.
Since subwoofers consume plenty of power, you’ll have to wire them to a power source like an amplifier and car battery. You’ll also need to attach a ground wire to a metal screw or bolt on your vehicle to protect yourself from potentially harmful electrical discharges.
Last Updated on April 6, 2024 by Brian Beasley